Pages

Showing posts with label 01.DVR Express Installation. Show all posts

Tuesday, December 7, 2010

4-3. Manual setup for sharers for DaivX CCTV ( DVR Express )


Normally, most of the setup for EVR Express is done automatically. So, the user can immediately use remote access only after the registration of DDNS.
(For those of you haven’t setup for DDNS, refer to 4-1. Internet setup to register a DDNS ID)

In case of a sharer in discordance with the standard policies for sharers, DVR Express will note you that the setup of the sharer has not been done and bring up a message asking for manual port forwarding ( 3389, 57001 and 57002 ports ).

In the case like that, manual port forwarding in needed.


In the image,
  1) Register DDNS at the Pointer F,
  2) And then, set up the port forwarding of the sharer.


--------------------------------------------------------------------------------------
Process to set up the port forwarding of the sharer

For the setup of DDNS for an IP sharer at Pointer C, open the setup box for the IP sharer. To do that, open the Internet Explorer of the sharer-connected computer, i.e. Pointer F, and access using default gateway value. (This is the most common way.)

For the setup of a sharer, refer to the user instructions or visit the website of the sharer manufacturer.


1.<Click on Execution in the start menu and then enter cmd>

2. If you enter "ipconfig /all" in a dos box, you will know the Internet environment connected to the system. Here, check the Default Gateway value.


3. Enter the Default Gateway value in the address line of the Internet browser, and that will bring up the setup box for.


1) Port forwarding setup
2) port forwarding setup/Defined list/User defined/rule name/internal IP address/use the IP of the currently accessed PC/protocol/external port/internal port/add
3) rule name/internal IP/protocol/external port/internal port/delete   

1) Select the port forwarding tab in the setup box.
2) As the private IP of Pointer F is 192.168.10.4 and the remote desktop function of the DVRExpress system uses the port 3389, enter and add as the image shows for registration like ③ 
3) If you want to use the remote access program instead of the remote desktop function, 50000~58000 will be allocated like ④.
Note) DVR Express uses 3389, 57001, 57002 port

FYI!!) sharer initialization
After the installation of DVR, in case of changing the share or moving DVR to a different location, you need a new setup for the sharer as follows.

1. In the network setup box of the configuration, move to the network port setup on the left-hand side.
2. Push the default value button for more than five times consecutively. Finish DVR Express and restart for a new setup.


Default

4-2. Settings for DaivX CCTV ( DVR Express )’s VMS

DVR Express’ remote monitoring supports both remote desktop connection and remote access.
Remote desktop connection is interlocked with DVR Express’ virtual engine. 
The virtual engine, using dual streaming, provides a remote coverage area for DVR Express HD’s Real D1. In addition, it is excellent in searching a remote area.

- DVR Express’ remote access  Execution
As you can see the following image, DVR Express provides an easy remote access anywhere to check images and data without an installation program
1) Star button -> Execution
2) Enter mstsc
3) Enter dvr.daivx.net
4) Access with ID : dvr, Pw : 1
Step 1. Click on Start and Execution on the bottom of the computer.
Step 2. Enter mstsc on the keyboard, and click on OK.
            Enter the name of the program, folder or Internet resource. (OK/Cancel/Search)
Step 3. In the remote desktop connection box, enter dvr.daivx.net and click on Connect
            Connect remote desktop (Connect/Close/Help/Options)
Step 4. Enter user name and password and then click on OK. ID : dvr, Pw : 1
            User name/Password (OK/Cancel/Close the system/Options)


This is possible thanks to the outstanding VMS function of DVR Express. VMS, or Virtual Management System provides a virtual function as if you see the actual DVR scenes.

You can use all the functions of DVR including monitoring, searching, setting configuration, and making changes in a remote area. In addition, it is possible not only infinite simultaneous access, but also different settings for available scenes according to the class of the user.  

The settings are as follows:

1. Set the computer like below that DVR Express has been installed.
Remote setting
Open/Explore/Search/Manage/Connect network drive/Disconnect network drive/Create a shortcut/Delete/Rename/Prosperities
Place the mouse on My Computer in the desktop folder and then click on the right button of the mouse to choose “Prosperities”.
In the system prosperities box, select the “Remote” tab. 

Remote
Remote Assistance – Allow remote assistance invitations to be sent from this computer
Remote desktop – Allow users to connect remotely to this computer – full computer name

Check Remote Assistance and Remote desktop.


2. Setting an account registration ID
 Create a new account
1) Select “User accounts” in the “Control Panel”
Generally, Windows always owns one account. (In the image, you can see the system has a Master’s account ID) Here, you can add an account for remote access.    

Type a name for the new account / Nex
2) Type User in the user name box and then click on the next. (This name is changeable.)

Computer administrator / Create an account
3) In the User Accounts, select as computer administrator.

User – Computer administrator
4) For Internet access, all accounts should use a password.

5) Select account ID then click creat password

New password
Confirm new password.
If the password contains capital letters, they must be typed the same way every time.
Type a password hint.
The password hint will be visible to everyone who uses this computer.
Create password

6) You can access remotely with the account ID and password created in this stage. After creating an account and password, a reboot should be performed to ensure the settings take effect.

4-1. Internet setup for DiveX CCTV (DVR Express)

DVR Express’ Internet setup that requires you to register ID and password will lead you to instant remote access.

In the Network Setup box of the Configuration, move to Remote Server Setup on the right hand side.
Remote server setup / Use DDNS
Connection
Register Dynamic DNS
DNS ID/Password/Confirm Password/DVR Location
Supervisor Confirmation / Register / Delete

1. Check the use of DDNS.
2. Type the ID, password, password confirmation, DVR location(region), etc.
3. Click on the Register button.

Remote server setup / Use DDNS
Connection
Register Dynamic DNS
DNS ID/Password/Confirm Password/DVR Location
Supervisor Confirmation / Register / Delete
DVR Report:
1. The DDNS ID you entered has been registered.


4. After successful registration, a popup will show a registration-completed message.
5. When the registration is completed, the DDNS Address will contain the address; the user can now use that address.  

The image above shows the address dvr.daivx.net, which means the ID, Dvr has been registered.
After ID registration is completed, the registered ID plus .daivx.net will become the DDNS address.  

Note)
1) DDNS User registration allows a serial number to be registered only one time, so pay attention to enter correct information. If the user forgets the serial number, they can find it using their DDNS ID and password.

2) If connected through a sharer, DVR Express will automatically proceed with port forwarding. Sharers in discordance with the standard policies for sharers, however, need manual port forwarding. For manual port forwarding, refer to 4-3. Manual setup for sharers for DaivX CCTV (DVR Express). For more details, refer to the user manuals provided by each sharer manufacturer.
 
At the initial installation and execution of DVR Express, a message will show you whether automatic port forwarding has been performed, or you need manual port forwarding.


Remote Access:
DVR Express provides two ways for remote access. 
Here will show you access using the software, DvrExp.exe
DvrExp.exe Program [Downroad]

Remote access program
Connection options
Access ID/Access IP/Password 
1) Connect server/change/delete/automatic start 
2) Internet transmission frame/frame/transmission quality/quality
3) Internet remote access way
5) Login/cancel


--- General features of the remote connection program ( DvrIntExp ) ---
   [1] Access IP, ID and password, [2] Setup transmission quality and frame
   [3] Setup a way to access       [4] Number of sockets for each channel
   [5] Login button        


--- Ports that the remote access program uses---
Open the ports of 57001, 5702 and 3389
-------------------------------------------------------------

How to use the remote access program:
1. The execution of DvrIntExp will bring up a box as below.
Access IP box: type the DDBS address that has been registered before.
Access ID and Password box: Enter ID and Password, neither the DDNS nor Windows account ID and password, but the ID and password that have been previously registered in the Network Setup box of the Configuration for DVR Express.

2. If you still haven’t changed the initial setup, you can see the screen from a remote area by logging on to the program with the access ID, ADMIN, and password, 111. Please refer to the user instructions for further details.
-------------------------------------------------------------
Note) After DVR installation, a new setup for a changed sharer or DVR’s new location is needed when necessary. The process is as follows.

1. Share system initialization:
Go to the Network Setup box of the Configuration, and then click the default value button for more than five times consecutively.
Network setup
Network socket setup – default value
Network port setup
Default value

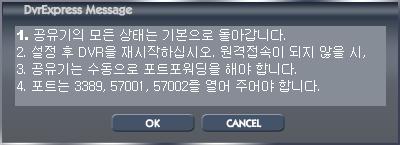
When you push it repeatedly, a message box will bring up to ask whether to return to the default.
1. All conditions will return to the default.
2. After setup, restart DVR. If remote access fails,
3. The sharer needs manual port forwarding.
4. The ports, 3389, 57001, 57002, need to be open.

After the execution of this, restart DVR Express after finishing. And then, DVR Express will proceed with port forwarding after spotting the external sharer.

3. Change the scene arrangement of DaivX CCTV ( DVR Express )

At the initial installation of a CCTV and connection to a camera, the user would want to change the order or arrangement of scenes.

In that case, follow the steps for rearrangement.
Switching scecnes: To change the arrangement of the channels, select the scene you want to move by clicking on Ctrl + F1 + mouse’s right button and dragging to the new scene position you want. As this function has an effect on the basic configuration of the DVR, it is recommended not to use after the initial installation.  


This image shows switching scenes. What is noticeable is the rearrangement of the field scenes using DVR Express’ VMS function to enter networks.

2-2. Setting Windows7 and Windows Vista

DVR Express fully support Windows 7 and Windows Vista, though one more setting is needed.

That means, after program setting, one more sating for DvrExp.exe and WatchDog.exe programs to run as an administrator. This is because Window 7’s security protocol has been reinforced. (Without this setup, the system will be rebooted repeatedly.) 


1. WatchDog.exe setup:
Go to " C:\Program Files\DvrExpress Setup\Software\WatchDog " to change the execution permission of WatchDog.exe.
1) Click on WatchDog.exe with the right button of the mouse to move to Properties.
Run as administrator(A) / Properties(B) 

2) On the compatibility tab, click on “Run this program as an administrator” and save it. 
Watchdog properties / compatibility / Privilege level – Run this program as an administrator

2. Setting DvrExp.exe: 
Move to C:\Program Files\DvrExpress Setup\Software\DvrExp Server\Application\App to apply the same so that DvrExp.exe can also be run as an administrator.

3. If you don’t do the settings above and reboot the system, it will be rebooted repeatedly. If that is the case, then boot into safety mode in order to solve rebooting issues. 
----------------------------------------------------------------------------------------
Note) Due to the Flip #D function under Windows Vista and Windows7, DVR Express’s use of DirectX can cause the monitor screen to go black, although the program is running. In that case, you need to cancel the function as follows:

1. You need to make changes to Windows advanced system settings.
Start menu -> Computer screen (click on the right button of the mouse) -> Prosperities(B) -> System box -> Click on advanced system settings in the left hand column.

That will bring up the system setting box.
Advanced system settings

Advanced tab -> Select performance settings(S) -> Performance options box -> visual effects tab
Then, uncheck Enable Desktop Composition in the box to disable the 3D function.
Advanced - Settings(S) / Visual Effects - Enable desktop composition


In reverse, check on Enable Desktop Composition will enable the 3D Flip function.


2-1. Setting up of the software for DaivX CCTV (DVR Express)

After the initial installation and execution of DVR Express, follow the next steps to use all the functions of the DVR Express. 

Note 1.) To update the software, please visit our website (www.daivx.com) or the online CCTV shopping mall (( www.yes-cctv.co.kr ) and the update programs.

Note 2.) As for Windows7 or Windows Vista, please refer to “2-2. Setting Windows7 and Windows Vista” before executing the below. Otherwise, multiple window pages will show or the system will be rebooted for several times because specific information has not been recorded on the system. 


1. When running the program initially, a message to enter the model number and password will appear. Normally, there are model and serial numbers on the side of the box. Please do not lose them.
(Enter certification numbers)


2. Running the program will bring up a main box; you need to route hard disk space for data to be recorded. Otherwise, the DVR Express will do it automatically.

Camera&movement/schedule/network setup/user management/sensors&alarm/PT2 setup/system setup/storage setup/information
storage setup
total
usage/hard disk/hard disk’s capacity/hard disk’s available capacity

Friday, December 3, 2010

1. DaivX CCTV ( DVR Express ) hardware installation

*The installation of hardware and software for DVR Express is very simple.
 Here, we will explain how to install and use DVR Express on your PC.

1. Power off your computer and insert the board to the PCI slot before booting.
(There are two types of DVR Express boards- one for the insertion to a PCI Express slot, which supports HD video, and the other for a PCI slot.)  


2. After booting, the Windows shows a message as follows and calls the device manager. 
                                                            (New hardware found / Multimedia video controller) 

   When the hardware box is brought up, insert the CD in your computer, and then route the driver.
This wizard will help you install the software for the following hardware.
Multi video controller
Please insert the installation CD or floppy disk included in the hardware kit.
Please select installation options.
- automatic software installation (recommended) (I)
- installation from a list or specific location (advanced) (S)
Please click [next] to continue.
Back / Next / Cancel   

3. When the installation is completed, the device manager will be shown as follows.
   (This is the DX-1204 product inserted to a PCI slot.)
Device Manager
Display adapter 
Mouse and other pointing devices
Universal serial bus controllers
Sound, video and game controllers
Legacy video capture devices
Legacy audio drivers
Media control devices
Video codec
Audio codec 
---
System devices
Computer
keyboard


4. After installing hardware related device drives, you can install the DVR Express software